Dns Server Configuration In Linux 6 Step By Step Pdf
Doki doki literature club sayori. Step by Step how to setup a DNS Server in RHEL 6.2/6.4/6.5 Using Bind
Mar 06, 2017 This is a step by step, complete guide to install & configure Apache on our Linux servers. Apache is a famous & most widely used web-server. Skip to content. Step by Step guide to configure APACHE server. By Shusain Published March 6, 2017 Updated June 5, 2018. APACHE Server. It is the most widely used web server in the world. Table of Contents Part IDocument Overview 3 Part IIDocument Details 4. Title Setting up an Email Server with RedHat Linux Summary Step-By-Step instructions on how to install an email server (including DNS, LDAP, POP) using RedHat Linux 7. The main configuration file of DNS is /etc/named.conf and should look, by default, something like.
What is DNS Server ?
DNS = Domain Naming Service (or) Domain Name SystemDNS will resolve the host name for the particular IP address.
Here Im Using RHEL Server to Setup the DNS Server using BIND
Primary DNS Server (or) Master DNS Server:
Secondary DNS Server (or) Slave DNS Server:
Nodes Machines :
- Primary DNS Server (or) Master DNS Server :
- Then Edit the Configuration of name server
Save and Exit the named.conf using wq!
- Creat the Forward and Reserve Zone files as mentioned in named.conf
FORWARD ZONE :
a.) Create a Forward Zone file under /var/named in the name of forward.linuxzadmin
There are Sample files under the /var/named/ Directory, Just make a Copy of that file and modify it as our need
b.) Make a Copy of sample file as below
c.) Edit the file forward.linuxzadmin
RESERVE ZONE:
a.) Create a Reserver Zone file under /var/named in the name of reverse.linuxzadmin
There are Sample files under the /var/named/ Directory, Just make a Copy of that file and modify it as our need
b.) Make a Copy of sample file as below
c.) Edit the file reverse.linuxzadmin
- The files we created was in root groupWe need to change those files to named group
Here we can see the files which have the root group
a.) List the files and see the permissions and group of those created zone files
b.) Change the group to named using below Command
Here we can see the Output now which changed to named group
c.) Then we need to check the Context of the files under
It want to be in the context of named_conf_t
If its Different than this then we need to restore the context using
- Now we need to Check for the Error in the conf file and Zone file
- Start the DNS Service
- Make the named Service in runlevels
- Deploy iptables Rules to allow DNS service
Add the iptables rules
Save the iptables Using
Restart the iptables Service Using
Make it to run in multi run levels
- Check the DNS server using Dig Command
- Check for the Available Hosts in DNS
Now we Need to Setup the Slave DNS server
Secondary DNS server (or) Slave DNS Server
- Host Deployed with RHEL Server
- Insatall the BIND package in Server
- Edit the named.conf to add the configuration
- Start the named Service and make it to Run in Multi Runlevels
- We Don't need to Create the Zone file here, If will be resolved from Master Server While we Start the Named Service
- Here we can Check the Both File's
This is the Out put of linuxzadmin.rev
- Check the DNS Server using dig from Slave Server
Client Side :

- Now we Need to Assign the Name Server for the Node's in our network to get assigned a host name from DNS server.
Use the Setup Command and assign the Primary and Secondary DNS server'sWe Don't need to Assing the hostname
a.) Just Assign the IP, Subnet, Gateway, PDNS, SDNS
b.) Restart the Network and Check the hostname
c.) Here i have not changed the hostname
d.) Here we can see the hostname Assigned from the DNS server
e.) If we need to check the DNS just do a Dig
- If we need to flush the DNS Server Caches Use Below Command
That's it we have a DNS server now in RHEL Server
Domain Name Service (DNS) is an internet service that maps IP addresses to fully qualified domain names (FQDN) and vice versa.
BIND stands for Berkley Internet Naming Daemon.
BIND is the most common program used for maintaining a name server on Linux.
In this tutorial, we will explain how to install and configure a DNS server.
If you are new to DNS, you should first understand the fundamentals of DNS and how it works.
1. Network Information
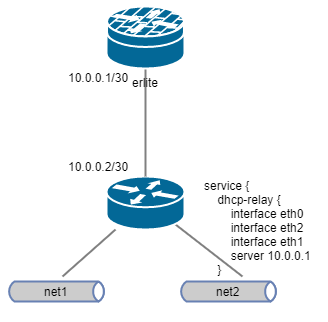
In this tutorial, we are going to setup a local DNS server for the network shown in the below diagram.
We’ll use “thegeekstuff.net” domain as an example for this DNS installation. “mail”, “web”, “ns” are the hosts that resides within this domain.
It is possible to configure a single system to act as a caching name server, primary/master and secondary/slave. We will configure this DNS as a Primay/Master as well as Caching DNS server.
We’ll be installing DNS server on “10.42.0.83”.
2. Install Bind
Install the bind9 package using the appropriate package management utilities for your Linux distributions.
On Debian/Ubuntu flavors, do the following:
On Redhat/CentOS/Fedora flavors, do the following:
All the DNS configurations are stored under /etc/bind directory. The primary configuration is /etc/bind/named.conf which will include other needed files. The file named /etc/bind/db.root describes the root nameservers in the world.
3. Configure Cache NameServer
The job of a DNS caching server is to query other DNS servers and cache the response. Next time when the same query is given, it will provide the response from the cache. The cache will be updated periodically.
Please note that even though you can configure bind to work as a Primary and as a Caching server, it is not advised to do so for security reasons. Having a separate caching server is advisable.
All we have to do to configure a Cache NameServer is to add your ISP (Internet Service Provider)’s DNS server or any OpenDNS server to the file /etc/bind/named.conf.options. For Example, we will use google’s public DNS servers, 8.8.8.8 and 8.8.4.4.
Uncomment and edit the following line as shown below in /etc/bind/named.conf.options file.
After the above change, restart the DNS server.
4. Test the Cache NameServer
You can use the dig command to test DNS services. DIG command examples explains more about how to perform DNS lookups.
Now when the second time you execute the dig, there should be an improvement in the Query time. As you see below, it took only 3 msec the second time, as it is getting the info from our caching DNS server.
5. Configure Primary/Master Nameserver
Next, we will configure bind9 to be the Primary/Master for the domain/zone “thegeekstuff.net”.
As a first step in configuring our Primary/Master Nameserver, we should add Forward and Reverse resolution to bind9.
To add a DNS Forward and Reverse resolution to bind9, edit /etc/bind9/named.conf.local.
Now the file /etc/bind/db.thegeekstuff.net will have the details for resolving hostname to IP address for this domain/zone, and the file /etc/bind/db.10 will have the details for resolving IP address to hostname.
6. Build the Forward Resolution for Primary/Master NameServer
Now we will add the details which is necessary for forward resolution into /etc/bind/db.thegeekstuff.net.
First, copy /etc/bind/db.local to /etc/bind/db.thegeekstuff.net
Next, edit the /etc/bind/db.thegeekstuff.net and replace the following.
- In the line which has SOA: localhost. – This is the FQDN of the server in charge for this domain. I’ve installed bind9 in 10.42.0.83, whose hostname is “ns”. So replace the “localhost.” with “ns.thegeekstuff.net.”. Make sure it end’s with a dot(.).
- In the line which has SOA: root.localhost. – This is the E-Mail address of the person who is responsible for this server. Use dot(.) instead of @. I’ve replaced with lak.localhost.
- In the line which has NS: localhost. – This is defining the Name server for the domain (NS). We have to change this to the fully qualified domain name of the name server. Change it to “ns.thegeekstuff.net.”. Make sure you have a “.” at the end.
Next, define the A record and MX record for the domain. A record is the one which maps hostname to IP address, and MX record will tell the mailserver to use for this domain.
Once the changes are done, the /etc/bind/db.thegeekstuff.net file will look like the following:
6. Build the Reverse Resolution for Primary/Master NameServer
We will add the details which are necessary for reverse resolution to the file /etc/bind/db.10. Copy the file /etc/bind/db.127 to /etc/bind/db.10
Next, edit the /etc/bind/db.10 file, and basically changing the same options as /etc/bind/db.thegeekstuff.net
Next, for each A record in /etc/bind/db.thegeekstuff.net, add a PTR record.
Whenever you are modifying the file db.thegeekstuff.net and db.10, you need to increment the “Serial” number as well. Typically admin uses DDMMYYSS for serial numbers and when they modify, the change the serial number appropriately.
Finally, restart the bind9 service:
7. Test the DNS server
Now we have configured the DNS server for our domain. We will test our DNS server by pinging mail.thegeekstuff.net from web.thegeekstuff.net.
If the ping is success, then we have configured the DNS successfully.
You can also use nslookup and dig to test DNS servers.
On web.thegeekstuff.net server, add the following to /etc/resolv.conf
Now ping, mail.thegeekstuff.net, which should resolve the address appropriately from the DNS server that we just configured.
If you enjoyed this article, you might also like.
Next post: How to Add Hyper-V Role on Windows Server 2008/2012 to Run Hyper-V Manager
Previous post: Happy New Year 2014 – From Geek and the Dolls